はじめての AWS Lambda python で boto3 から ec2 を起動する
はじめての AWS Lambda で boto3 から ec2 を起動する
いまさら感ありありですが表題のことを Management Console からやってみます。
初期画面

bluprint
Get Started で進むとたくさんのサンプルから選ぶことができますが、今回は Skip します

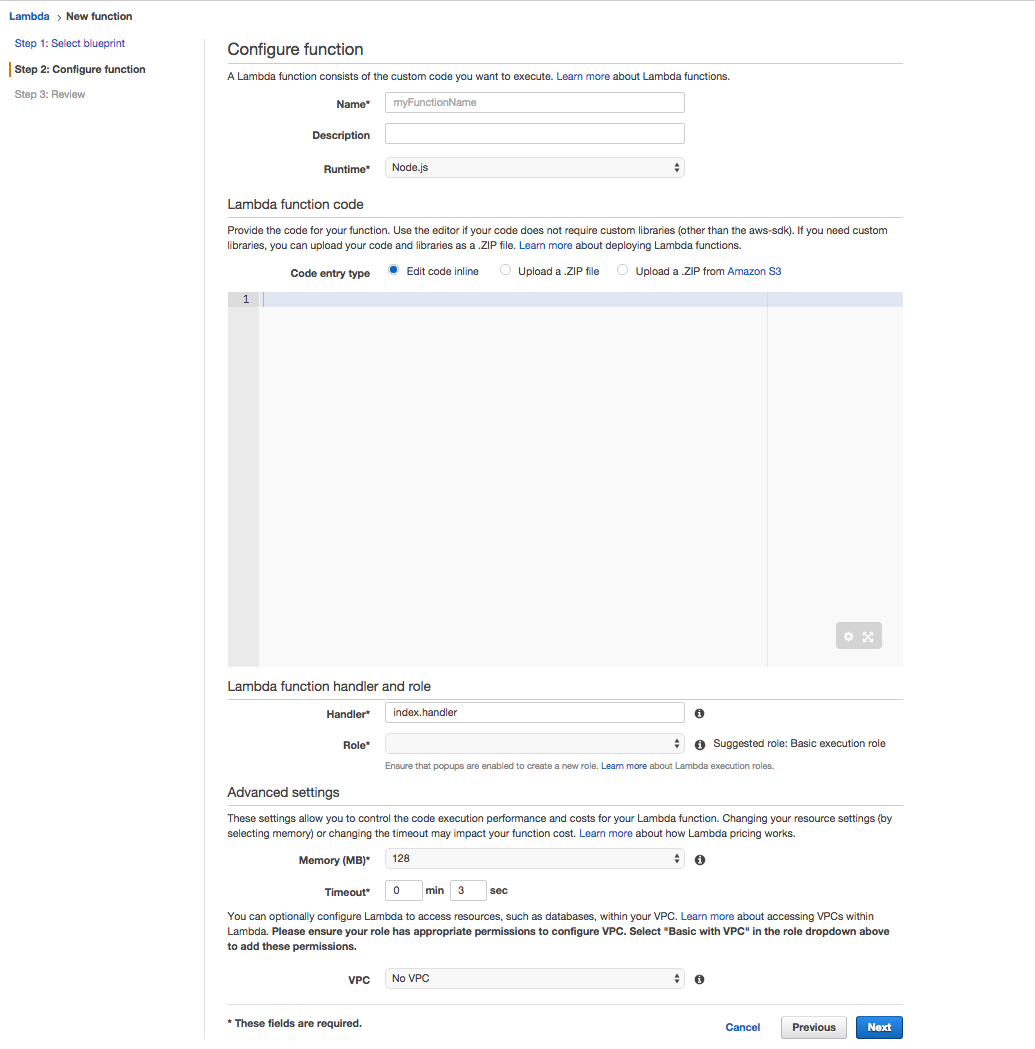
Configure function
設定画面が表示されますので、さっそく Lambda Function を定義していきます。

- Name
- Lambda Function の名前。
- Description
- 説明を記載します。必須ではありません。
- Runtime
今回は python2.7 にします。 (というか java も node.js もさっぱりです。。)
Lambda function code
デプロイ方法は 3 種類あります。
- Edit Code inline
- 画面のエディタに直接記述
- Upload a .ZIP file
- zip ファイルを upload
- cli からやるときは zip でやるとよさそうです
- Upload a .ZIP from Amazon S3
- S3 にコードをアップロードしておき、その S3 URL を記載します
今回は Edit Code inline でやってみます。
test タグが True で stopped なインスタンスを起動するという単純なスクリプトを用意しました。
#!/usr/bin/env python
# -*- coding: utf-8 -*-

import sys
import boto3

ec2 = boto3.resource('ec2')


def get_specified_tagged_instance_ids(target_tag):
    """
    get target tagged instance-id
    """
    try:
        instances = ec2.instances.filter(
            Filters=[
                {'Name': 'tag:%s' % target_tag, 'Values': ['True']},
                {'Name': 'instance-state-name', 'Values': ['stopped']}])
    except Exception, e:
        print(e)
        sys.exit(2)

    if not instances is None:
        i = []
        for instance in instances:
            i.append(instance.instance_id)
    else:
        print("not found target tagged instances")
        sys.exit(0)

    return i


def start_instances(target_tag):
    """
    start instances
    """
    try:
        instances = get_specified_tagged_instance_ids(target_tag)
    except Exception, e:
        print(e)
        sys.exit(2)

    for instance in instances:
        res = ec2.instances.filter(InstanceIds=[instance]).start()
        status_code = res[0]["ResponseMetadata"]["HTTPStatusCode"]
        if status_code == 200:
            print("operation complete. target -> %s" % instance)
        else:
            print("operation failed. target -> %s" % instance)
            sys.exit(1)


def lambda_handler(event, context):
    target_tag = "test"
    start_instances(target_tag)
    sys.exit(0)
lambda_hanlder() を __main__ 的に使うようにしてみました。
なお、lambda_hanlder() という名前は好きなものに変えることができます。
Lambda function handler and role
- Handler
- デフォルトは
lambda_function.lambda_handler - 例えば test.py の
hello_world()を実行したい場合はtest.hello_worldとすることができます
- デフォルトは
- Role
- 適切な IAM Role を付与します。
Role について、今回は basic vpc から作成してみます。 デフォルトの policy は以下のようなものでした。
{
  "Version": "2012-10-17",
  "Statement": [
    {
      "Effect": "Allow",
      "Action": [
        "logs:CreateLogGroup",
        "logs:CreateLogStream",
        "logs:PutLogEvents"
      ],
      "Resource": "arn:aws:logs:*:*:*"
    },
    {
      "Effect": "Allow",
      "Action": [
        "ec2:CreateNetworkInterface",
        "ec2:DescribeNetworkInterfaces",
        "ec2:DetachNetworkInterface",
        "ec2:DeleteNetworkInterface"
      ],
      "Resource": "*"
    }
  ]
}
ここに ec2:DescribeInstances と ec2:StartInstances を追加して保存します。
Advanced settings
- Memory
- 128MB から 1536MB まで選択できます
- Timeout
- 5min まで設定できます
- VPC
- VPC を選択すると、lambda が起動する Subnet / Secrurity Groupを指定できます
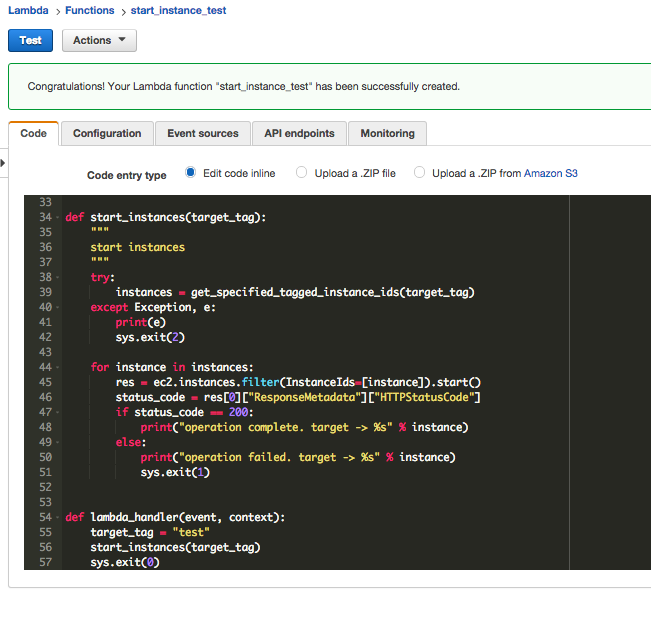
確認画面
こんな感じになりました。 Create function に進みます。

Function の定義

今回は一日一回実行することにしますので Event Source のみ使います。

Add event source から CloudWatch Events Schedule を選択します。

- Rule Name
- 名前をつけます
- Rule Description
- 説明を記載します
- Schedule Expression
- rate (*) は繰り返し実行する時に使います
- cron も書けますのでとても便利です
- cron の時間は UTC のみです
指定したら submit します。Enable now の場合、少し待つと lambda が起動します。 Monitoring タブと CloudWatch Logs で稼働状況を確認できます。
CloudWatch Logs
Monitoring タブの View logs in CloudWatch からこの function の log stream に移動できます。
print 文の内容が表示されていますね。

awscli
一連の流れを awscli で行うとしたら以下の様な感じかと。
- コードを zip にする
- iam role を作成しておく(手抜き)
- function を作成する
- zip ファイルなので
file://ではなく、fileb://なことに注意
- zip ファイルなので
aws lambda create-function \
  --function-name auto_start_test \
  --runtime python2.7 \
  --role arn:aws:iam::**********:role/lambda_basic_vpc_execution \
  --handler auto_start.lambda_handler \
  --zip-file fileb://auto_start.zip \
  --timeout 30 \
  --memory-size 128 \
  --vpc-config SubnetIds=subnet-*******,SecurityGroupIds=sg-****** \
  --region ap-northeast-1
- event を作成する
aws --profile lk-staging events put-rule \
  --name test \
  --schedule-expression "rate(5 minutes)" \
  --state ENABLED

{
    "RuleArn": "arn:aws:events:ap-northeast-1:**********:rule/test"
}
ただ、function と event の関連付ける方法がわかりませんでした。。。
ご存知の方、いらっしゃれば教えて下さい!